Profiles
- 17 Jun 2022
- 2 Minutes to read
- Print
- DarkLight
- PDF
Profiles
- Updated on 17 Jun 2022
- 2 Minutes to read
- Print
- DarkLight
- PDF
Article summary
Did you find this summary helpful?
Thank you for your feedback
.png) Profiles
Profiles
The Profiles page allows the user to register a soft edge cluster profile to provision cloud hosted (AWS and Azure) VMs as Akridata soft edges.
Add Profile
To add a profile, follow the below instructions:
- Click
 button located on the top right corner of the screen.
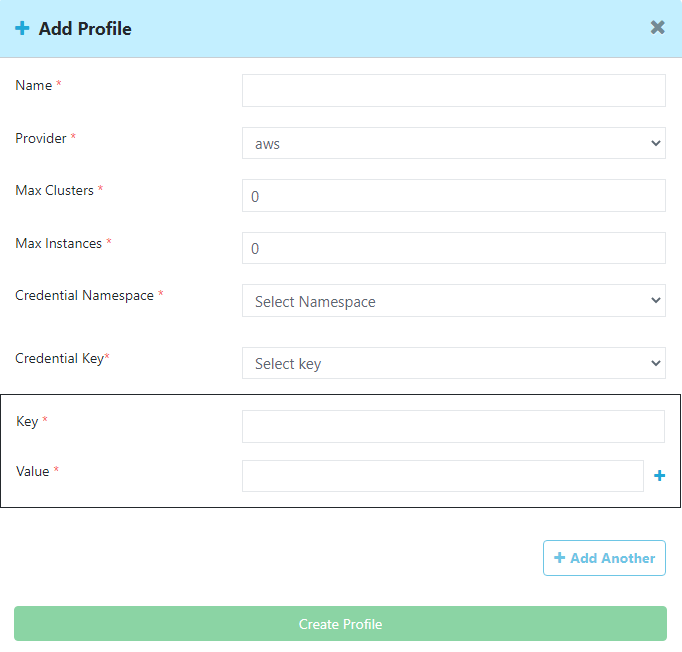
The Add Profile window opens. Add Profile
 - Enter the Name.
- To choose the Provider click on the dropdown arrow.
- To set the Max Clusters value click on the up-down control to increment or decrement the value. The ‘Max clusters’ specify the maximum number of soft edge clusters that can be created using this profile.
- To choose the Credential Namespace click on the dropdown arrow.
- To choose the Credential key click on the dropdown arrow.
- Enter configuration parameters as a list of ‘key-value’ pairs with the Key field and value in the Value field.
- Click
 button to add a new key and value.
 - Click
 button to delete a key and its value.
- Click
- Click Create Profile to add the profile and save to AkriManager. The saved profile is displayed in the Profiles page.
- Click
 button to add another profile and repeat instructions 1 to 6.
 - Click
 icon to close the window and go back to Libraries>Profiles page.
In the Profiles page, following fields are displayed,
- Name: The profile names are displayed in this column.
- Provider: Provider details are displayed in this column.
- # of cluster(s): Number of clusters is displayed in this column.
- # of instance(s): Number of instances is displayed in this column.
- Actions: This column displays options to,
View Profile
To view a profile, follow the below instructions:
- Click
 icon in the Actions column. The profile details are displayed.
 - Click
 icon to close the window and go back to the Libraries>Profiles page.
Delete Profile
To delete a profile, follow the below instructions:
- Click
 icon in the Actions column. A dialogue box with Delete and Cancel buttons is displayed.
 - Click Delete to delete the profile or Cancel to go back to Libraries>Profiles page.
Edit Profile
To edit a profile, follow the below instructions:
- Click
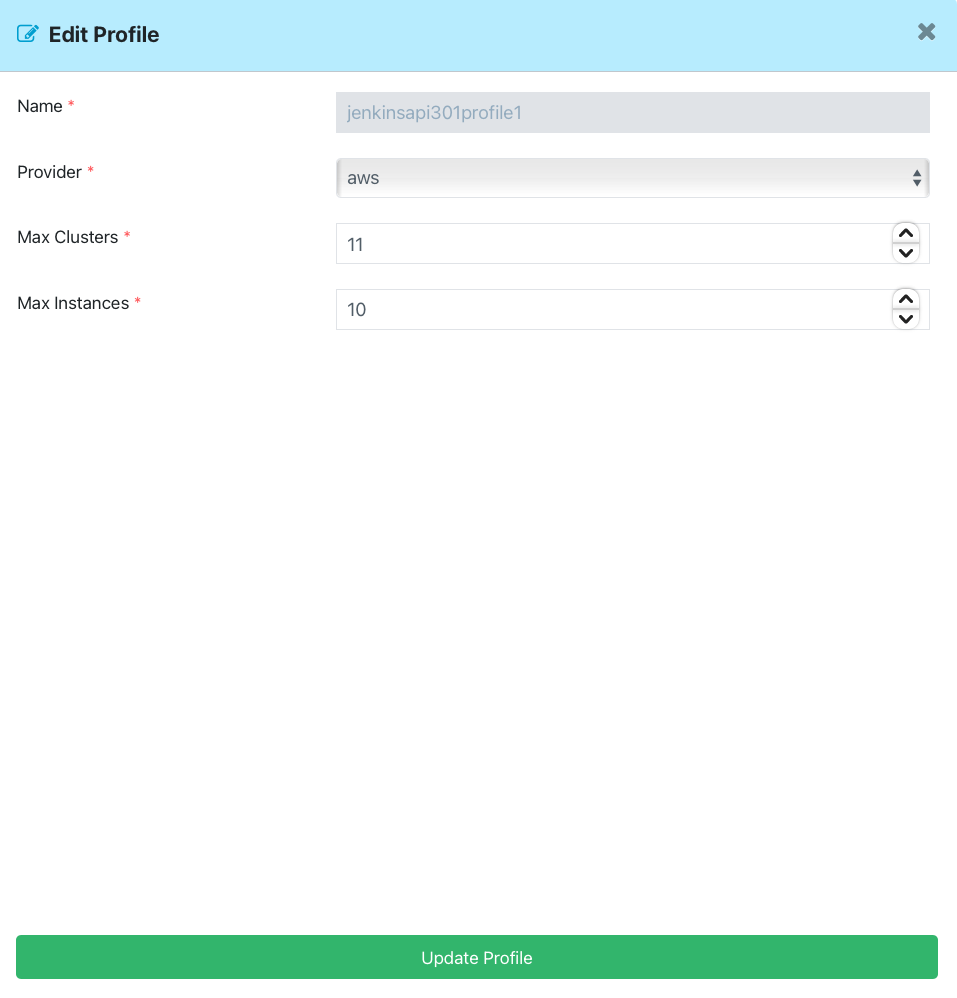
 icon in the Actions column. The Edit Profile window opens.
 Edit Profile
Name and Provider details are displayed.
- To set the Max Clusters value click on the up-down control to increment or decrement the value.
- To set the Max Instances value click on the up-down control to increment or decrement the value.
- Click Update Profile to save the changes.
- Click
 icon to close the window and go back to Libraries>Profiles page.
Was this article helpful?


.png)
 button located on the top right corner of the screen.
 button to add a new key and value.
 button to delete a key and its value.
 button to add another profile and repeat instructions 1 to 6.
 icon to close the window and go back to Libraries>Profiles
  icon in the Actions column. The profile details are displayed.
 icon to close the window and go back to the Libraries>Profiles
  icon in the Actions column. A dialogue box with Delete and Cancel buttons is displayed.
 icon in the Actions column. The Edit Profile window opens.
 icon to close the window and go back to Libraries>Profiles