- 17 Jun 2022
- 2 Minutes to read
- Print
- DarkLight
- PDF
Keys
- Updated on 17 Jun 2022
- 2 Minutes to read
- Print
- DarkLight
- PDF
.png) Keys
Keys
The Keys page allows the user to manage API keys for API based access to Akrimanager functionality.
Add Keys
To create keys, follow the below instructions:
- Click
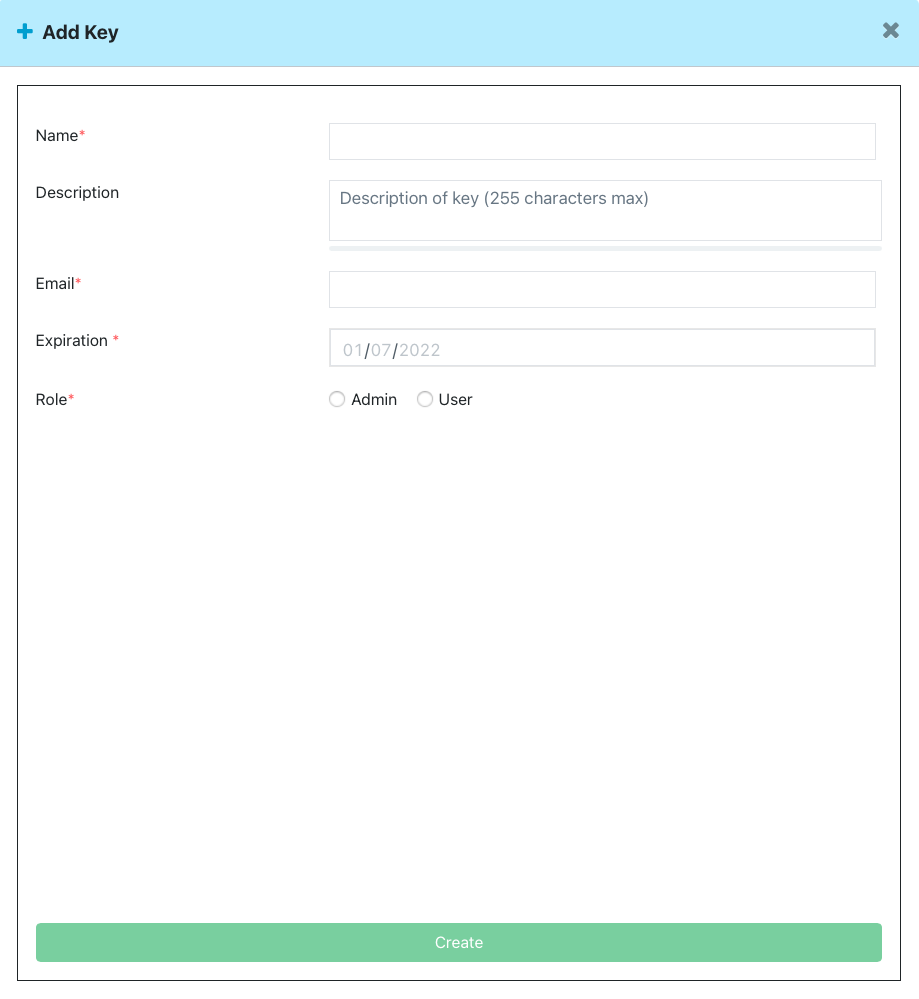
 button located on the top right corner of the screen. The Add Keys window opens.
 Add Keys
 - Enter the name and description in the respective fields.
- Enter email address to which key expiry notifications will be sent.
- Enter the expiration date for the key in dd/mm/yy format.
Note: This date can be updated later anytime before expiry of the key. - Click on the radio button to choose the role (Admin or User).
Note: This is the role which defines the scope of capabilities available to the API key. - Click Create to create and save the key into AkriManager.
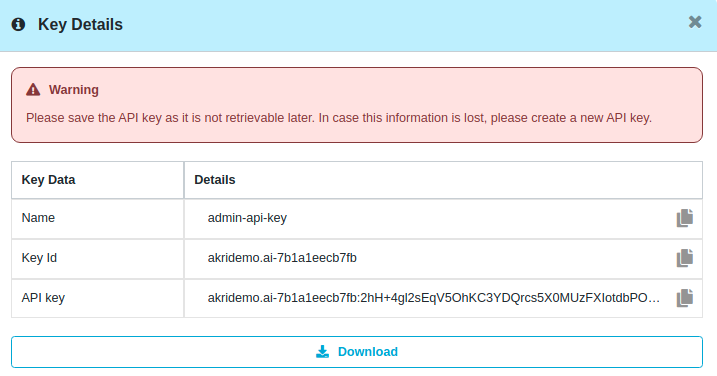
- On successful creation of the API key, the following ‘download key’ screen is displayed.
 Download Key
 - The API key is available only in the above screen and not retrievable later and hence ‘Download’ or ‘Copy’ the API key from this screen.
- Click
 icon to close the window and go back to the Keys page.
 - The API key must be filled in ‘X-API-KEY’ http header when invoking any API. Refer to API programmers guide for details.
The following fields are displayed in the Keys page,
Name
The key names are displayed in this column.
To search a particular key,
- Enter the key name in the field and click Enter on the keyboard.
Key ID
The key IDs are displayed in this column.
To search a particular key,
- Enter the key ID in the field and click Enter on the keyboard.
Role
The roles of the users are displayed in this column.
- To search a particular user role,
- Enter the role of the user in the search field and click Enter on the keyboard.
Status
The active, inactive and expired status of the keys is displayed in this column. To filter and view status of the keys,
- Click on the drop down arrow and select the filters. A green tick appears after it is selected.
The keys according to the filters are displayed.
Added On
The dates on which the keys were added are displayed in this column.
Expiry On
The expiry dates of the keys are displayed in this column.
Actions
This column displays options to,
View Details
To view details of a key, follow the below instructions:
- Click
 icon in the Actions column. The details of the key are displayed.
 - Click
 icon to close the window and go back to the Libraries>Keys page.
Edit Key
To edit a key, follow the below instructions:
- Click
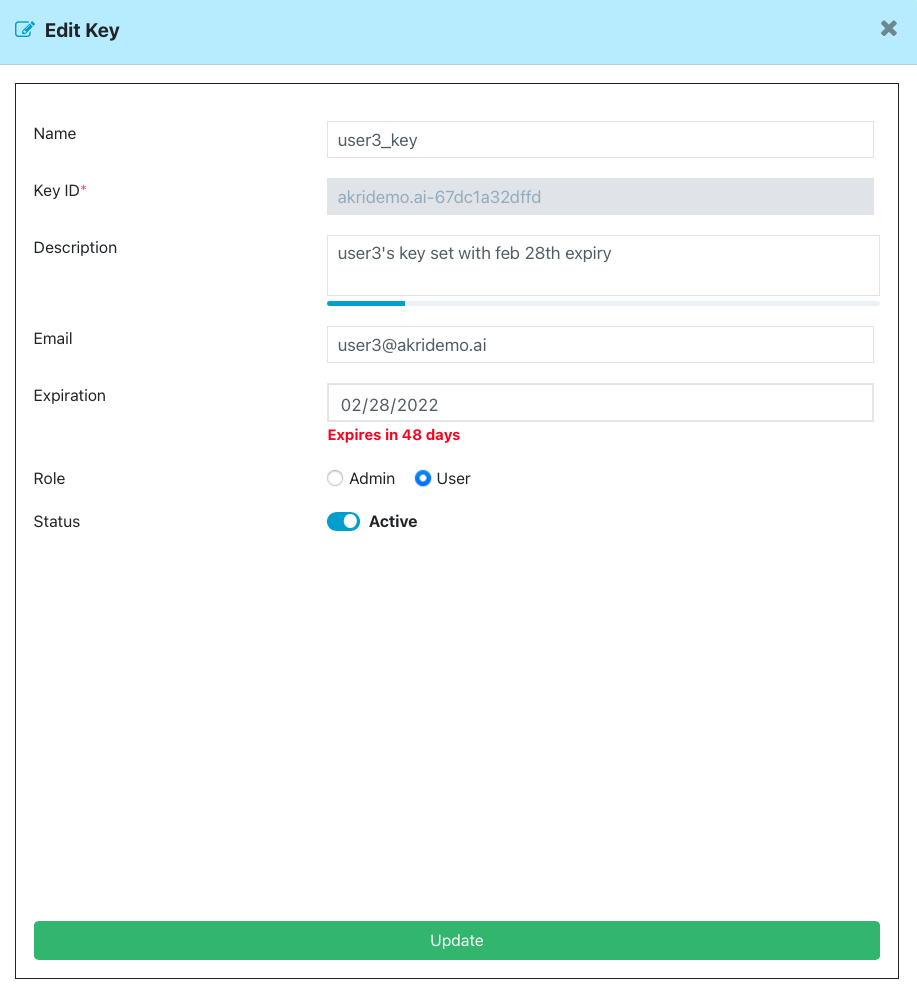
 icon in the Actions column. The Edit Key window opens.
 Edit Key
Name, Key ID, Description, and Email are displayed.
- Enter the expiration date in dd/mm/yyyy format or click on the calendar field to expand the calendar and select the expiration date.
Note: The expiration date is displayed in red. - Click on the radio button to choose the Role (Admin or User).
- Click on the slide button to change the Status to Active or Inactive.
- Click on Update to update the information.
- Click
 icon to close the window and go back to the Libraries>Keys page.
Delete a Key
To delete a key, follow the below instructions:
- Click
 icon in the Actions column. A window with Delete and Cancel buttons is displayed.
 - Click Delete to delete the key or Cancel to go back to the Libraries>Keys page.
Inactivate a Key
When a key is in the active state and you want to inactivate it,
- Click
 icon in the Actions column.
 - Reactivate the key by clicking
 icon.
icon.


 button located on the top right corner of the screen. The Add Keys window opens.

 icon to close the window and go back to the Keys page.
 icon in the Actions column. The details of the key are displayed.
 icon to close the window and go back to the Libraries>Keys page.
 icon in the Actions column. The Edit Key window opens.
 icon to close the window and go back to the Libraries>Keys page.
 icon in the Actions column. A window with Delete and Cancel buttons is displayed.
  icon in the Actions column.
  icon.
icon.