Autolabel jobs run the labeling models using the label specs as input. Once the autolabel job process is complete, you can view the job results, review them, and accept or reject them depending on their accuracy.
Refer to the Auto Label Jobs topic for steps to create and submit an auto label job.
This article describes the steps to visualize the auto label job results and categorize the labels.
Once the auto labeling is completed, you can do the following activities:
Slice and filter the results based on various parameters.
Review sample jobs and accept or reject the results.
Save accepted results as a ResultSet for reference.
Export ResultSets to dataset catalog table or download the labels
Refer to the following video to navigate and manage labeling jobs.
Visualize Auto Label Jobs
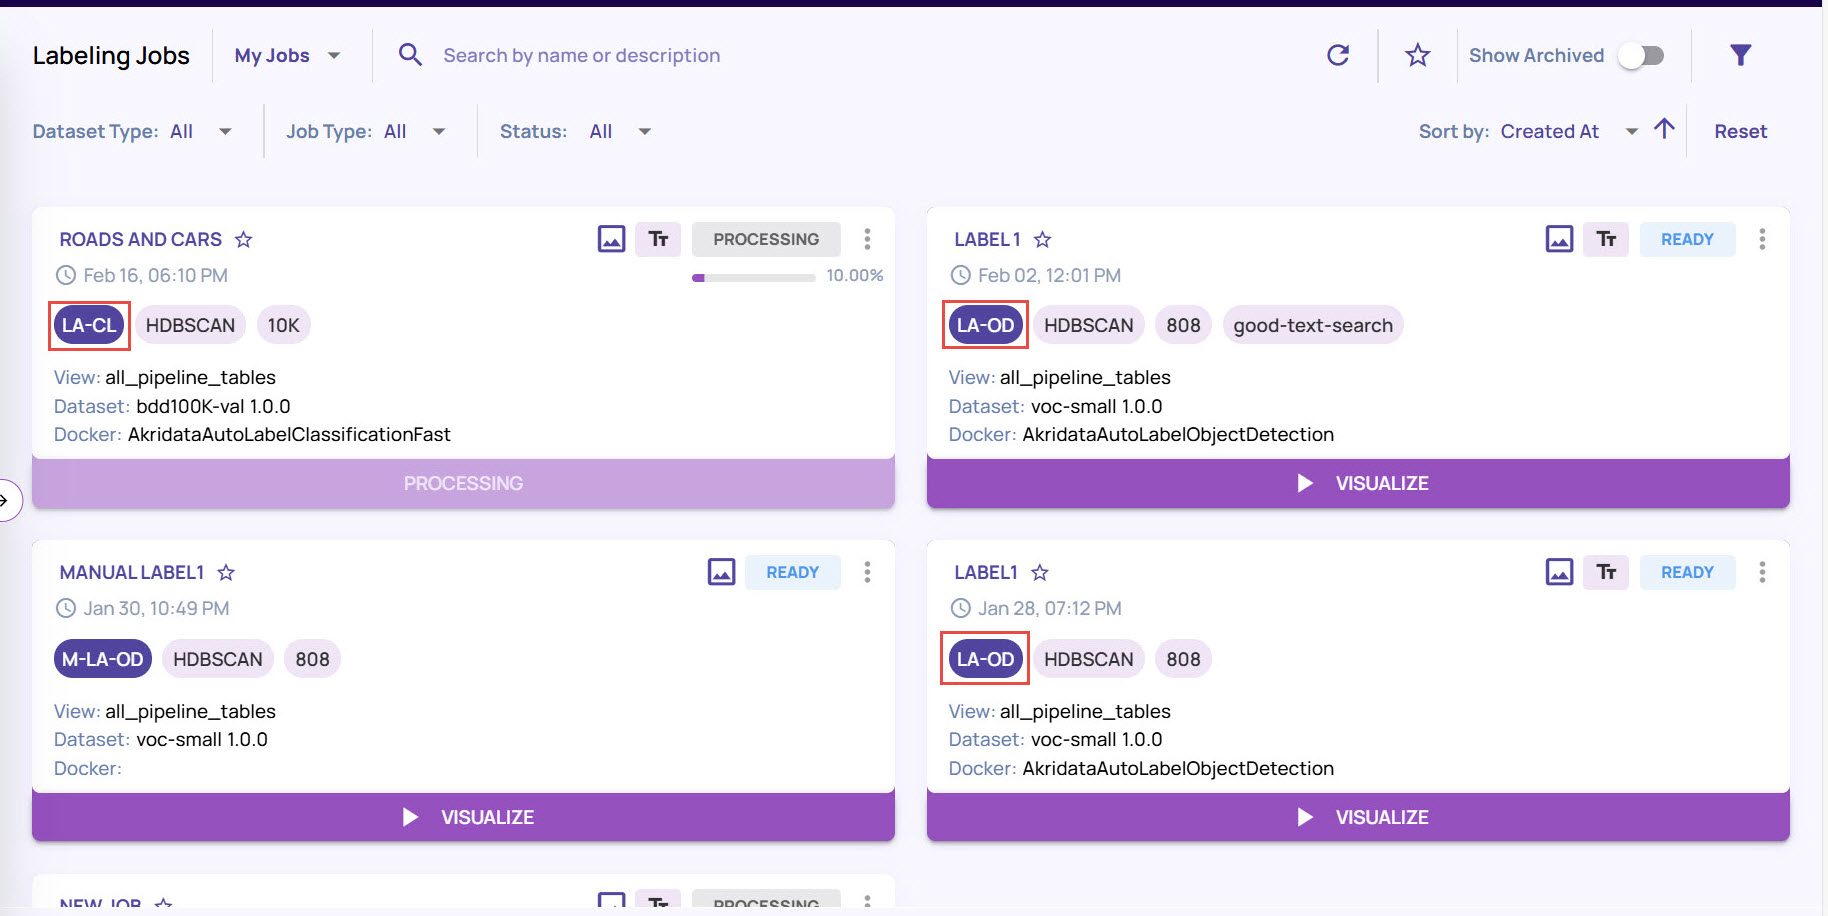
To open and visualize auto label job results, navigate to Label > Jobs to view the job on the Labeling Jobs screen.
Once you submit a label job, it appears as Processing. Once the process is complete, the job appears as Ready.
Label Jobs created with Labeling Classification are listed with the label LA-CL
Label Jobs created with Labeling Object Detected as listed with the label LA-OD.
The following sections explain how to visualize label job results.
Visualize Classification-based auto label job
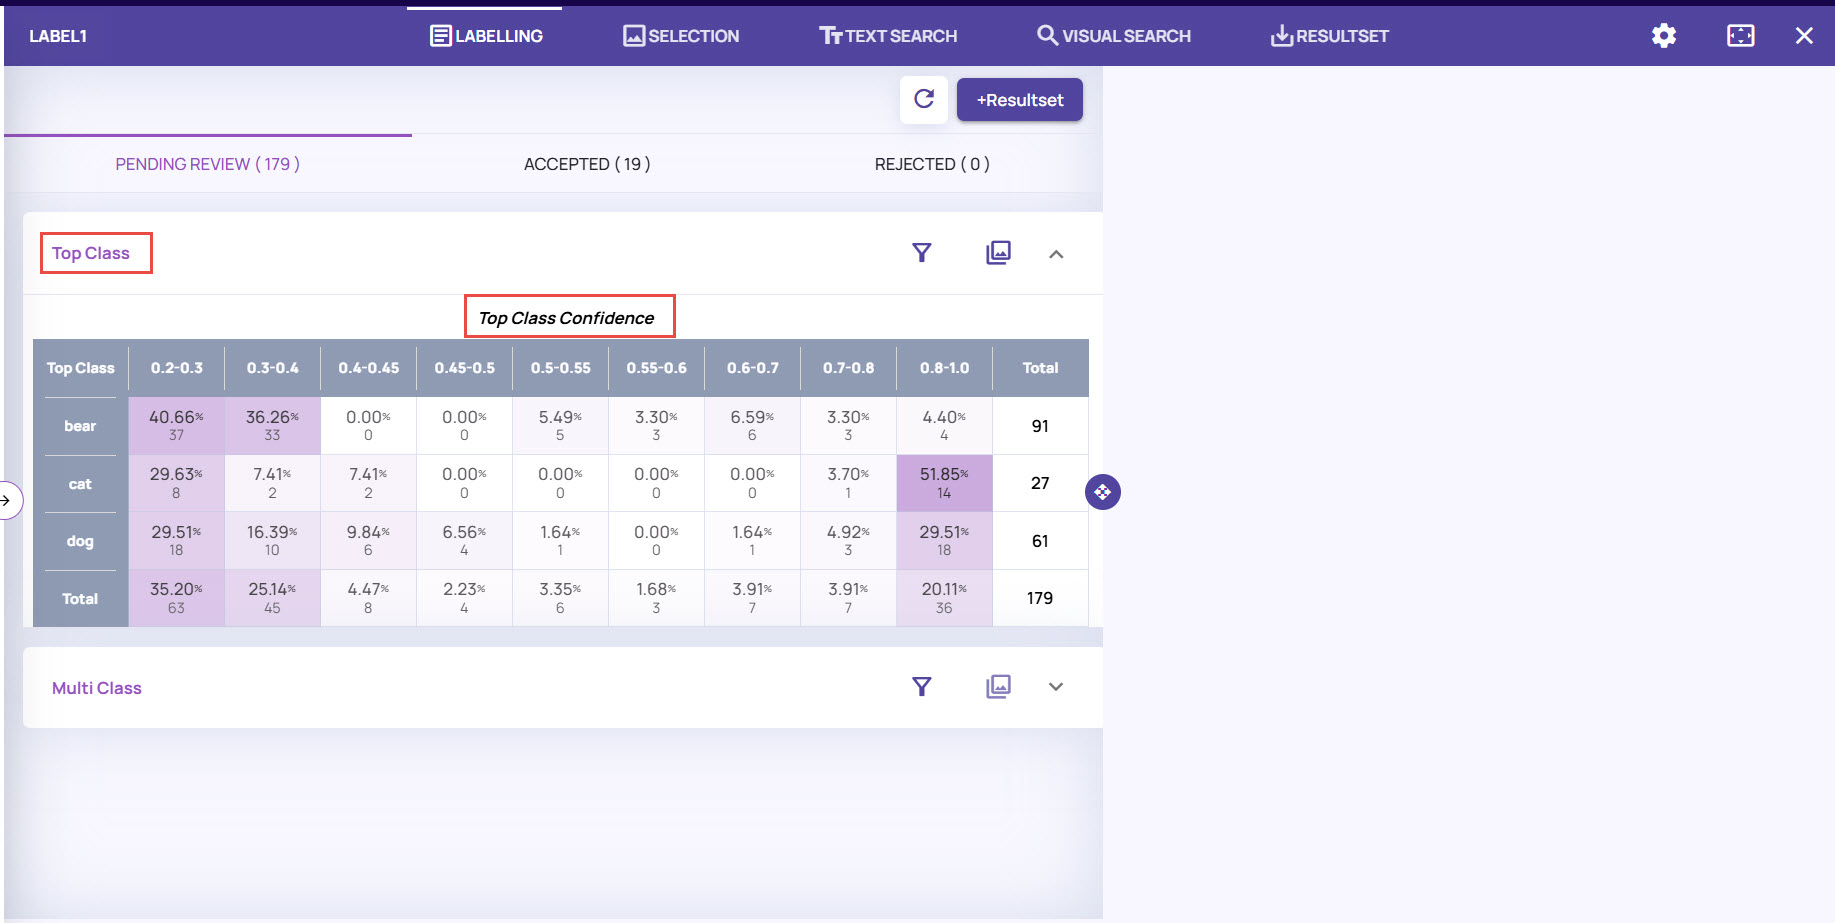
On the Labeling Jobs page, locate the label job card with the label LA-CL for which the status is shown as READY, and click Visualize.
The label job page displays the top classes segregated by the confidence value in a tabular format.
.jpg)
By default all the results appear under the Pending Review tab.The Top Class table displays the results for different classes specified for the job.
The Multi Class table displays the results considering the confidence values of multiple classes against the selected top class.
View results based on Top Class confidence.
Select one of the confidence threshold values in the Top Class table.
Click the image icon on the top-right corner.
The right-side panel displays the corresponding image classified based on the confidence value that you have selected.
Unlike Object Detection type, the Classification type label job displays the images that match the specified classification.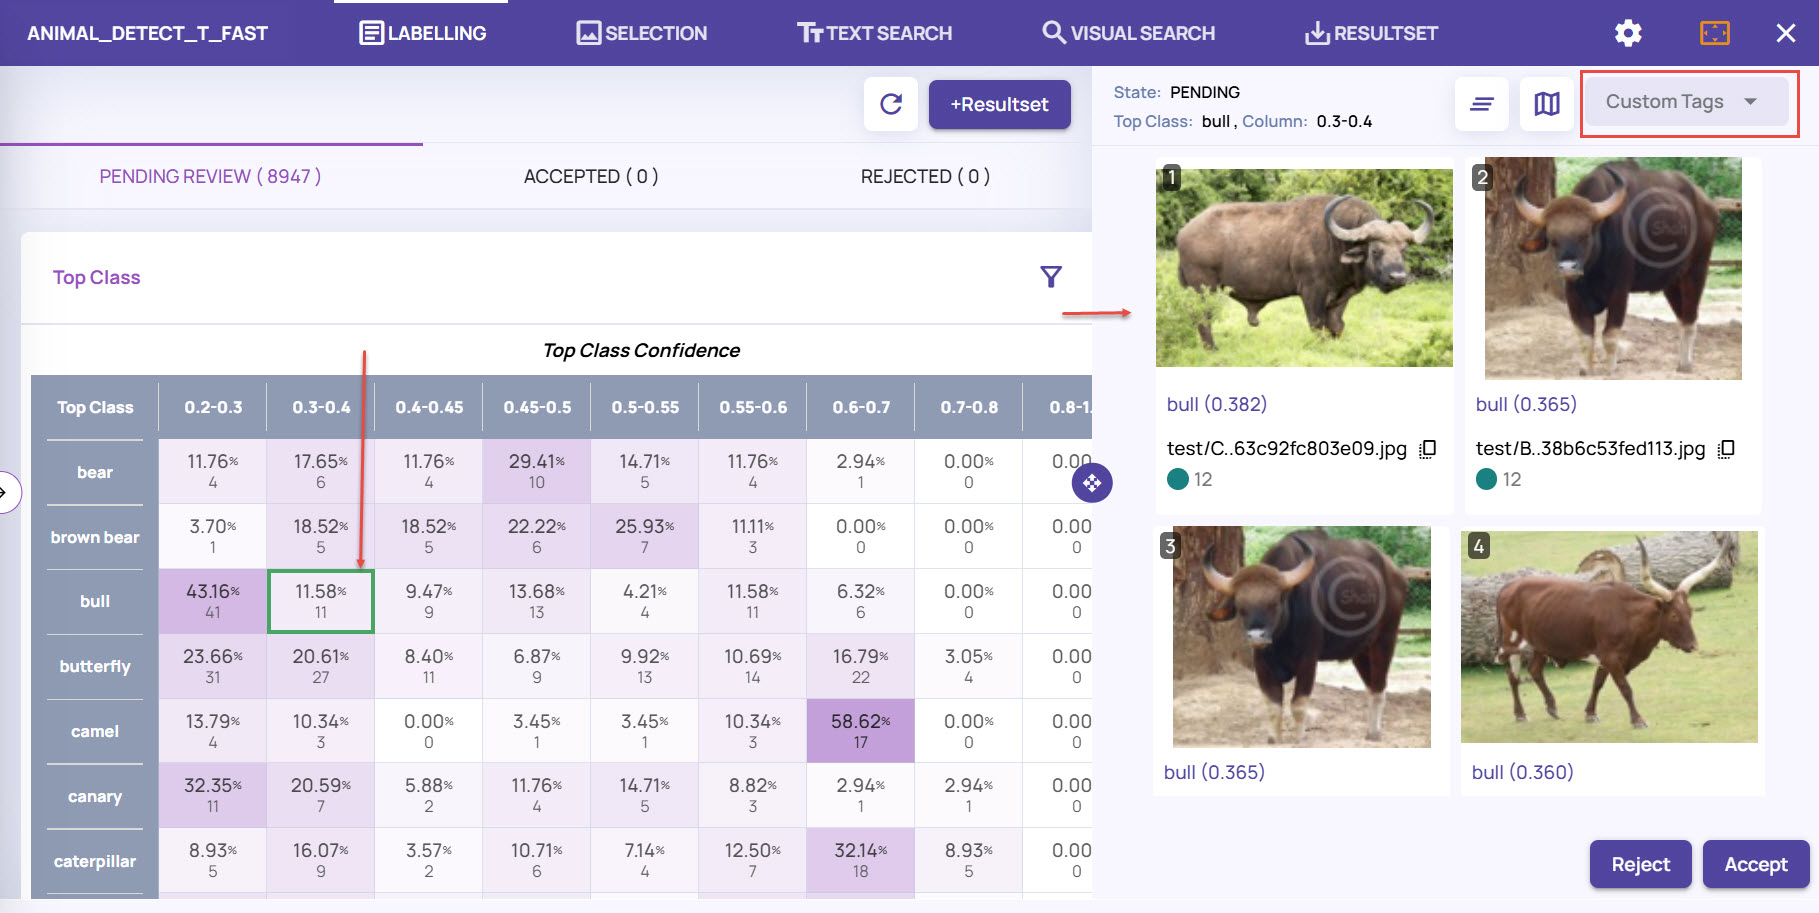
You can set custom tags for one or more images, if required, to enable effective visualization and analysis. Refer to Image Tagging for more information.
View results based on Multi Class confidence.
The model assigns a top class with a top class confidence value and a list of possible classes referred to as multi classes with a higher multi class confidence value. This is useful in scenarios where there are close-by classes. For example, an object “is a dog” may be detected with confidence 0.5 Vs an object “is either a dog or fox” may be detected with a higher confidence. You need to set up the Multi Class table with the required parameters based on your requirements to see the results.Click the Multi Class section to set up the options and view the Multi Class Confidence results.
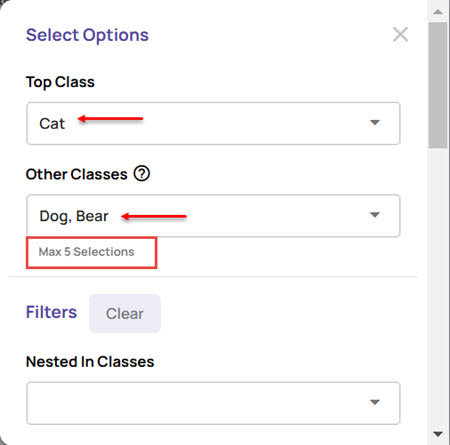
In the Select Options window, select the Top Class and Other Classes from the classes you have added while creating the label job.
You can choose a maximum of 5 other classes.
.jpg)
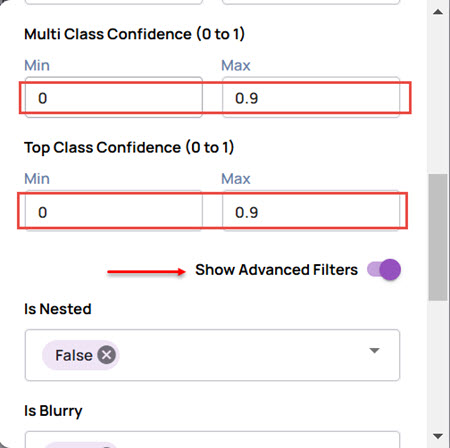
Specify the Multi Class Confidence and Top Class Confidence thresholds, and click Apply.

Based on the settings for Multi Class, the table displays the accuracy results for the specified top class matching the other class.
Select one of the result values from the table, and click the Image icon on the top-right corner of the section. The right-side panel displays the corresponding images based on the classification identified within the confidence threshold limit.
.jpg)
You can review and accept or reject the results.
Visualize Object Detection-based auto label job
Similar to visualizing the auto label job results for Classification type, you can view the label job results for Object detection type.
On the Labeling Jobs page, locate the label job card with the label LA-OD for which the status is shown as READY, and click Visualize.
The auto label job page displays the top classes segregated by the confidence value in a tabular format.
By default all the results appear under the Pending Review tab.The Top Class table displays the results for different confidence values against each of the classes you created for the job.
The Multi Class table displays the results considering the confidence values of multiple classes against the selected top class.
View results based on Top Class confidence.
Select one of the confidence threshold values in the Top Class table
Click the image icon on the top-right corner.
The right-side panel displays the corresponding image detected with the confidence value that you have selected.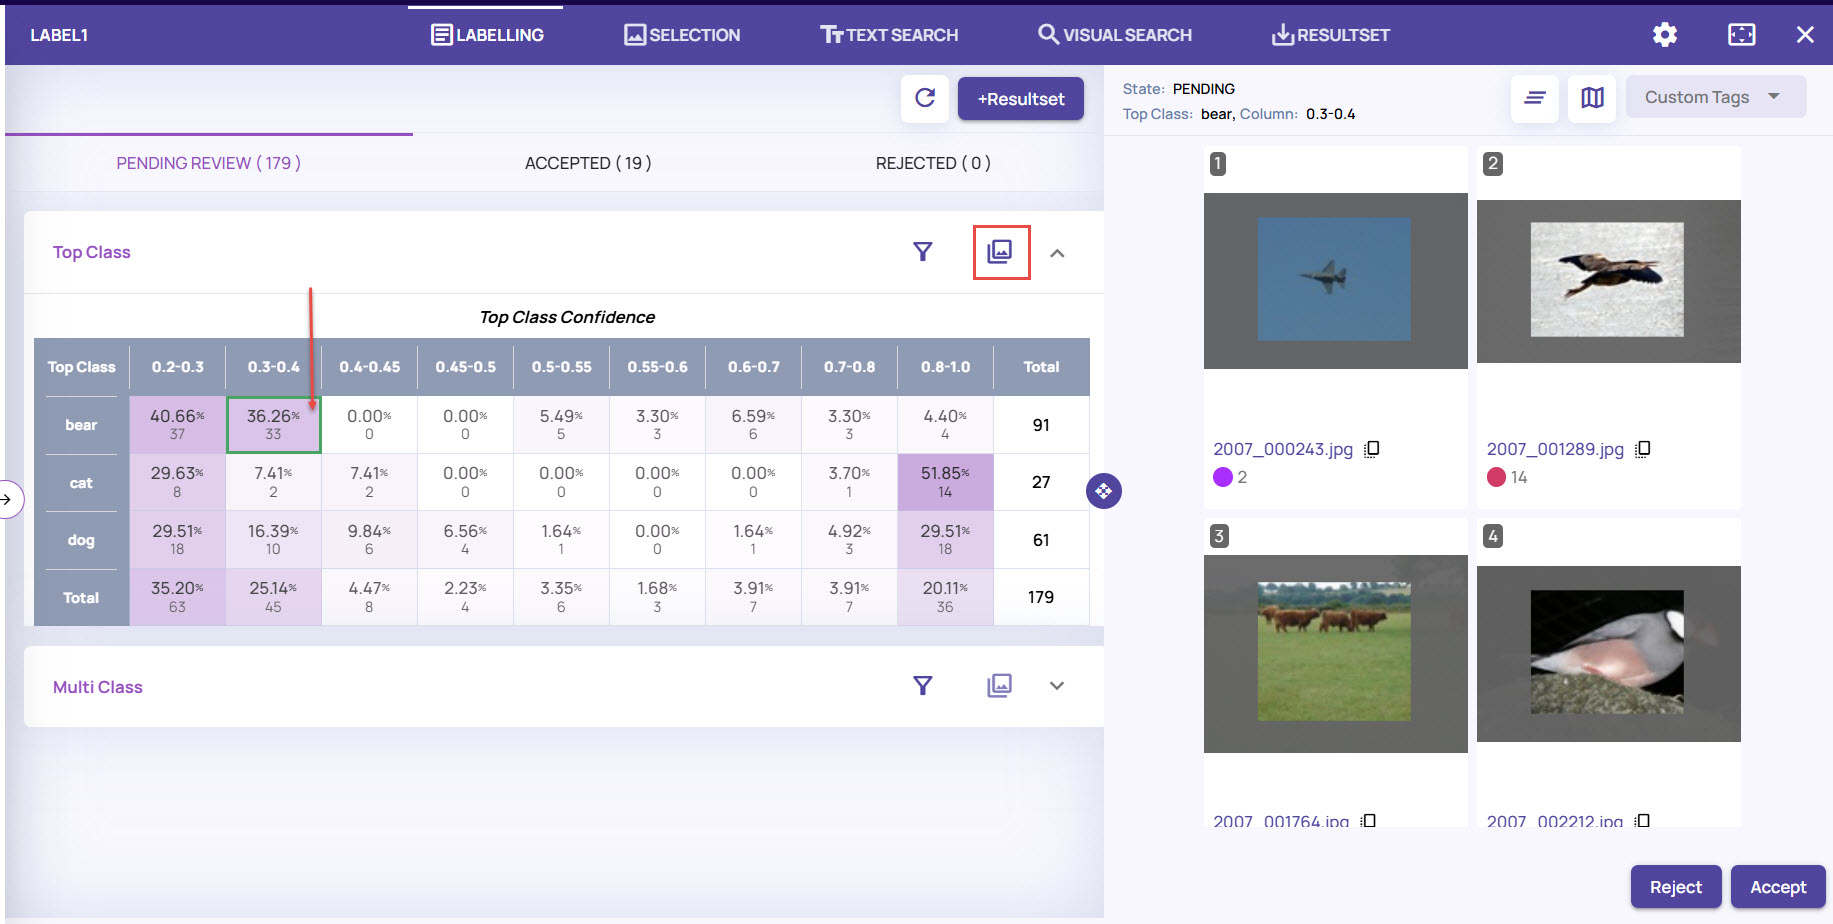
View results based on Multi Class confidence. The model assigns a top class with a top class confidence value and a list of possible classes referred to as multi classes with a higher multi class confidence value. This is useful in scenarios where there are close-by classes. For example, an object “is a dog” may be detected with confidence 0.5 Vs an object “is either a dog or fox” may be detected with a higher confidence. You need to set up the Multi Class table with the required parameters based on your requirements to see the results.
Click the Multi Class section to set up the filter options to view the Multi Class Confidence results.
In the Select Options window, select the Top Class and Other Classes from the classes you have added while creating the label job.
You can choose a maximum of 5 other classes.
Under Nested in Class, select the class that will be considered as parent class where other classes are nested, if applicable.
Specify the Multi Class Confidence and Top Class Confidence thresholds.
Set up other Advanced Filters options, as needed.
Select Group by as Multi Class Confidence or other options as per the filter options you have set, and click Apply.
Based on the filter settings for Multi Class, the table displays the detection accuracy results.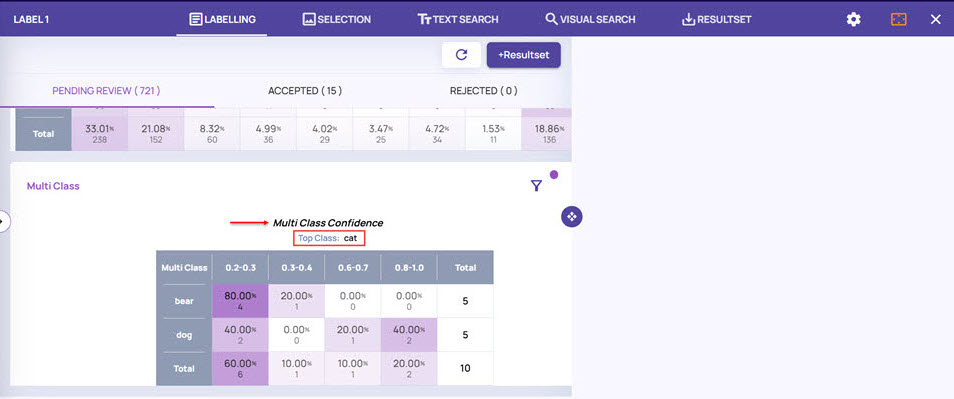
Select one of the result values from the table, and click the Image icon on the top-right corner of the section. The right-side panel displays the corresponding images with annotations indicating the confidence thresholds.
Based on the Job Type and other options selected/enabled for the label job, you can review and accept or reject the results.
Filter auto label job results
In the label job page, click the Filter icon.
In the Filters window, specify the required details to filter the results.
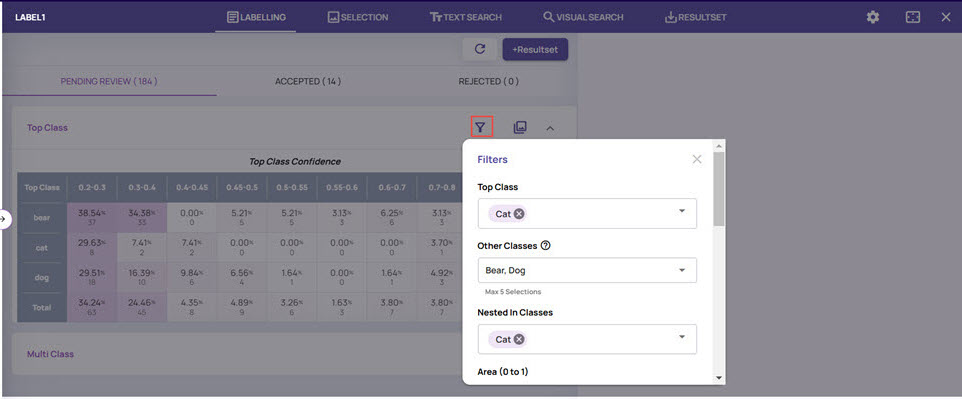
Select the Top Class and Other Classes, as needed.
Top classes are the primary predictions with high confidence values, whereas other classes are the predictions with generally low confidence values. You can select Other Classes only when a single Top Class is selected.
You can select one top class and a maximum of 5 other classes. You can also filter the results based on more than one top class, in which case you cannot select other classes.
Specify the Top Class Confidence values to filter results as per the Min and Max values.
Select Group by, and click Apply.
The label job page displays the results based on the filter parameters. This is similar to viewing the Multi Class table results.
Review auto label job results
On the label job page, you can view the results of the images for different threshold values for accuracy. For illustration purposes, let us consider review of the label job of Object Detection type. Once you are satisfied with the results based on the detected components indicated with annotations, you can accept to move the results to the Accepted category.
Navigate to Label > Jobs, locate the job card, and click Catalog.
In the label job page, review the images for values and accept or reject the results.
Click a value under the Top Class Confidence table to view the images.
Review the images for accuracy based on the various conditions specified while creating the auto label job.
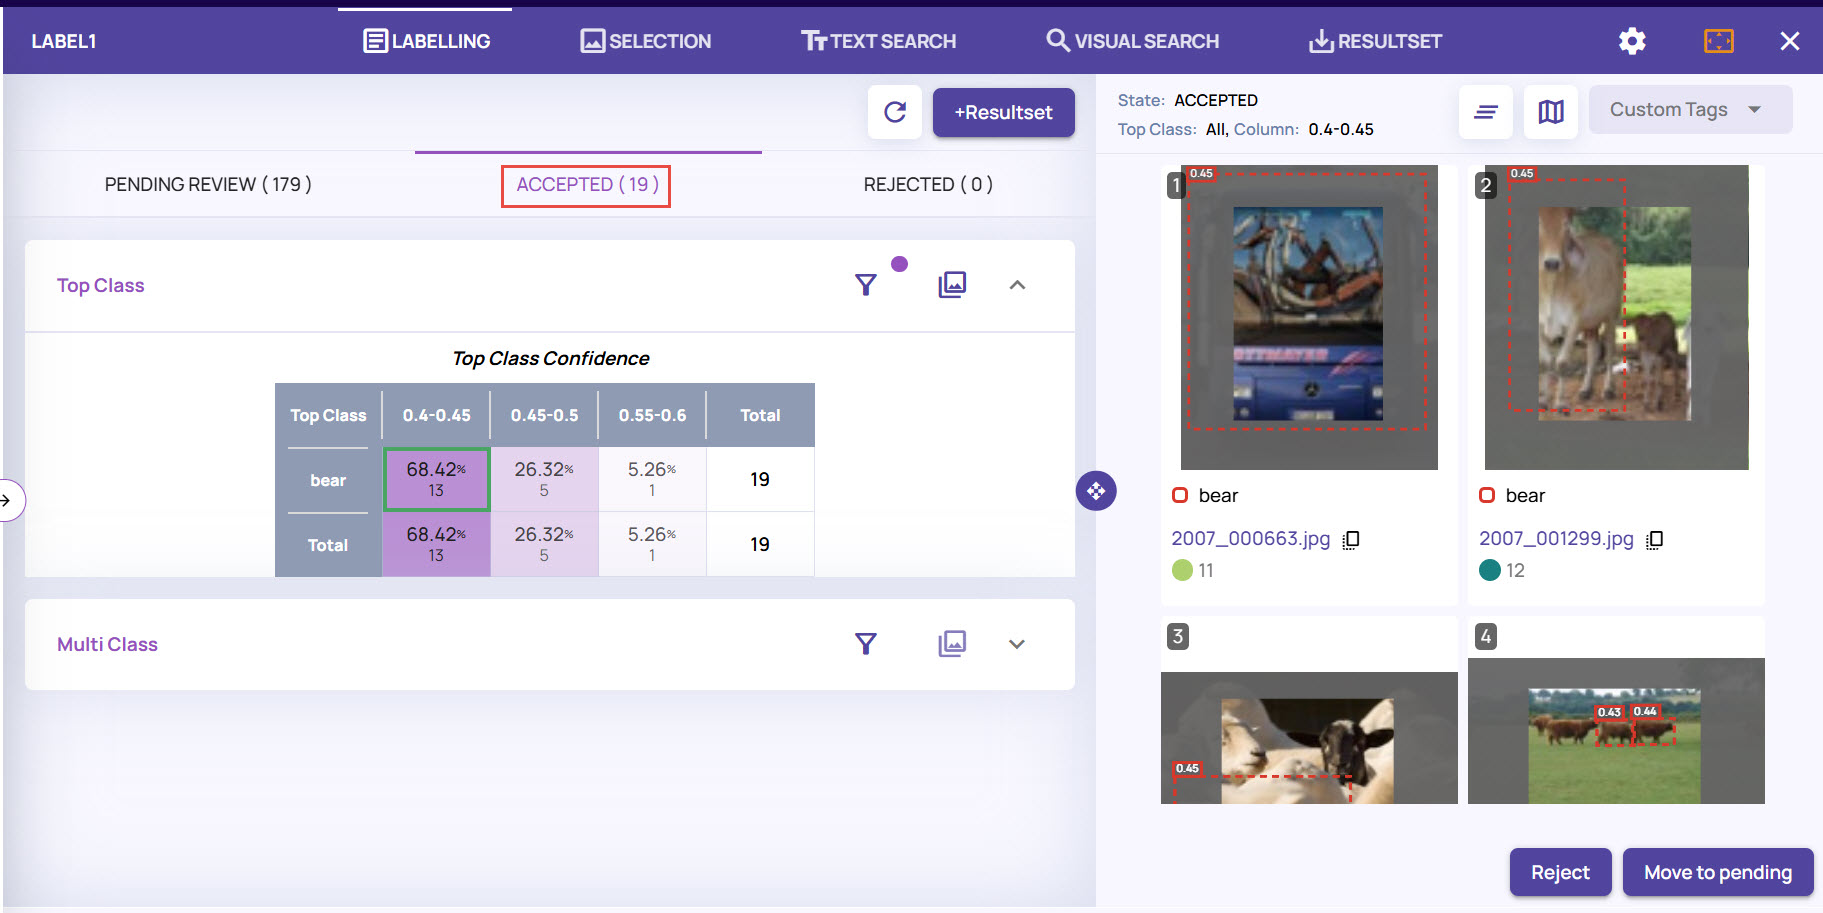
Accept or Reject the results.
To accept the results of all images displayed for the selected value, click the Accept button.
The set of images will be accepted and moved under the Accepted tab.To accept/reject an image individually:
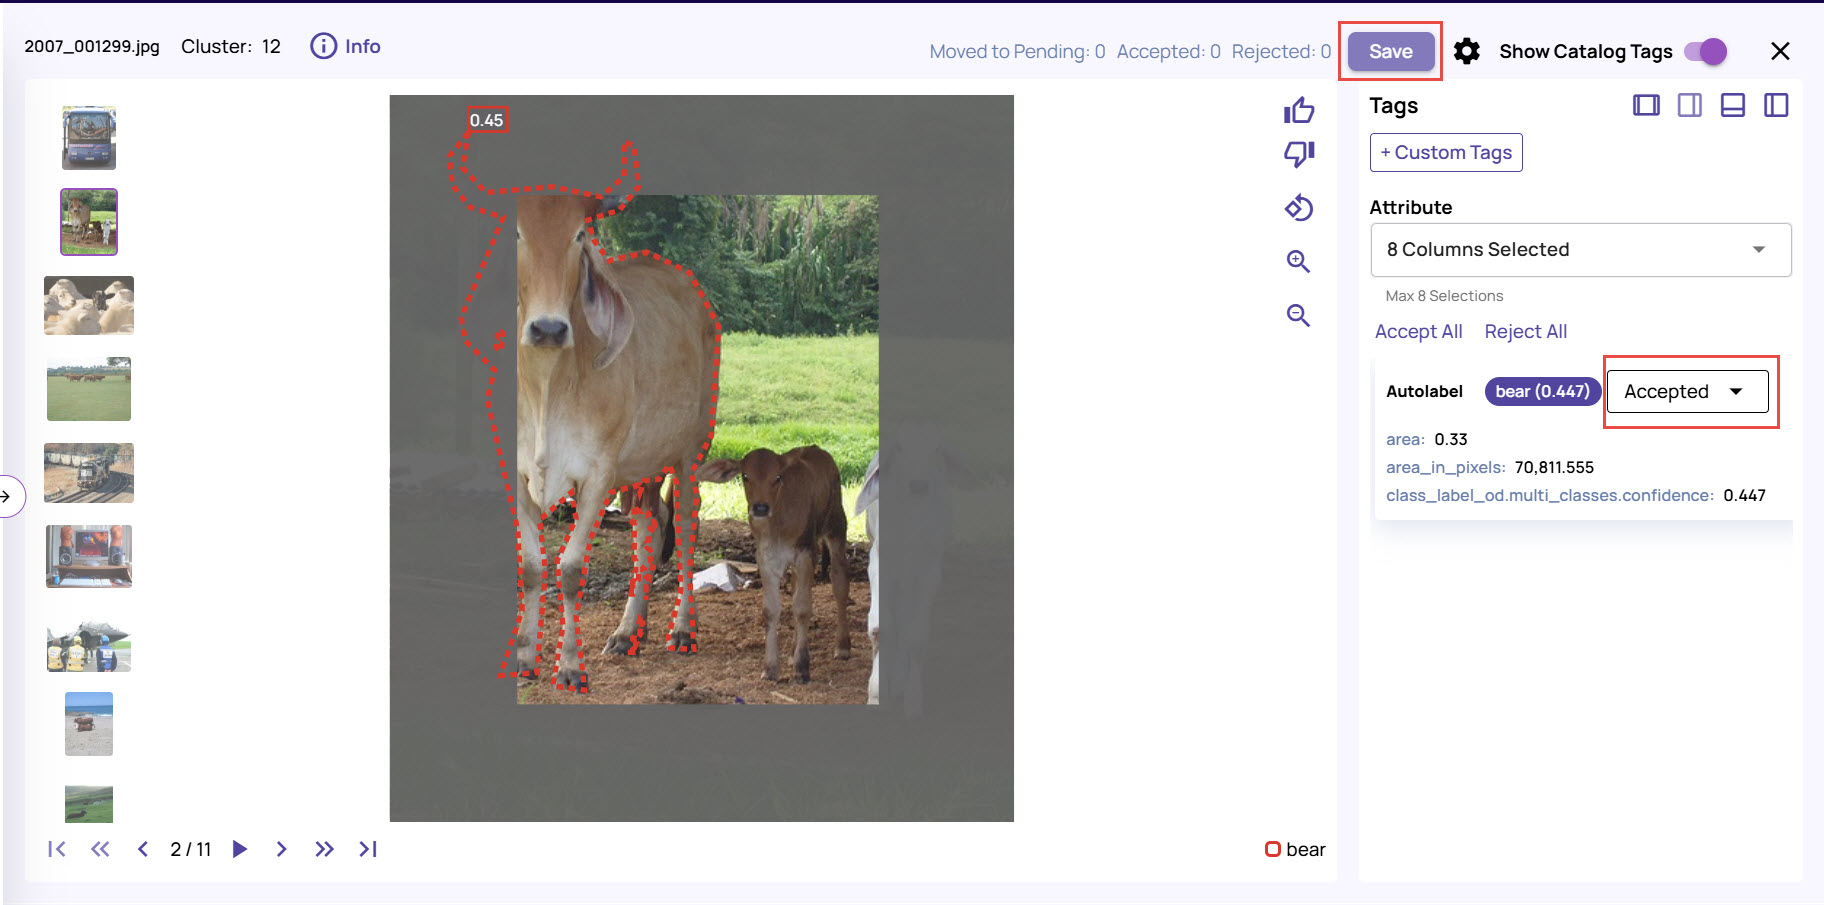
Select an image and click the expand icon.
In the Images window, review the image.
Select Accepted or Rejected from the drop-down options and click Save.
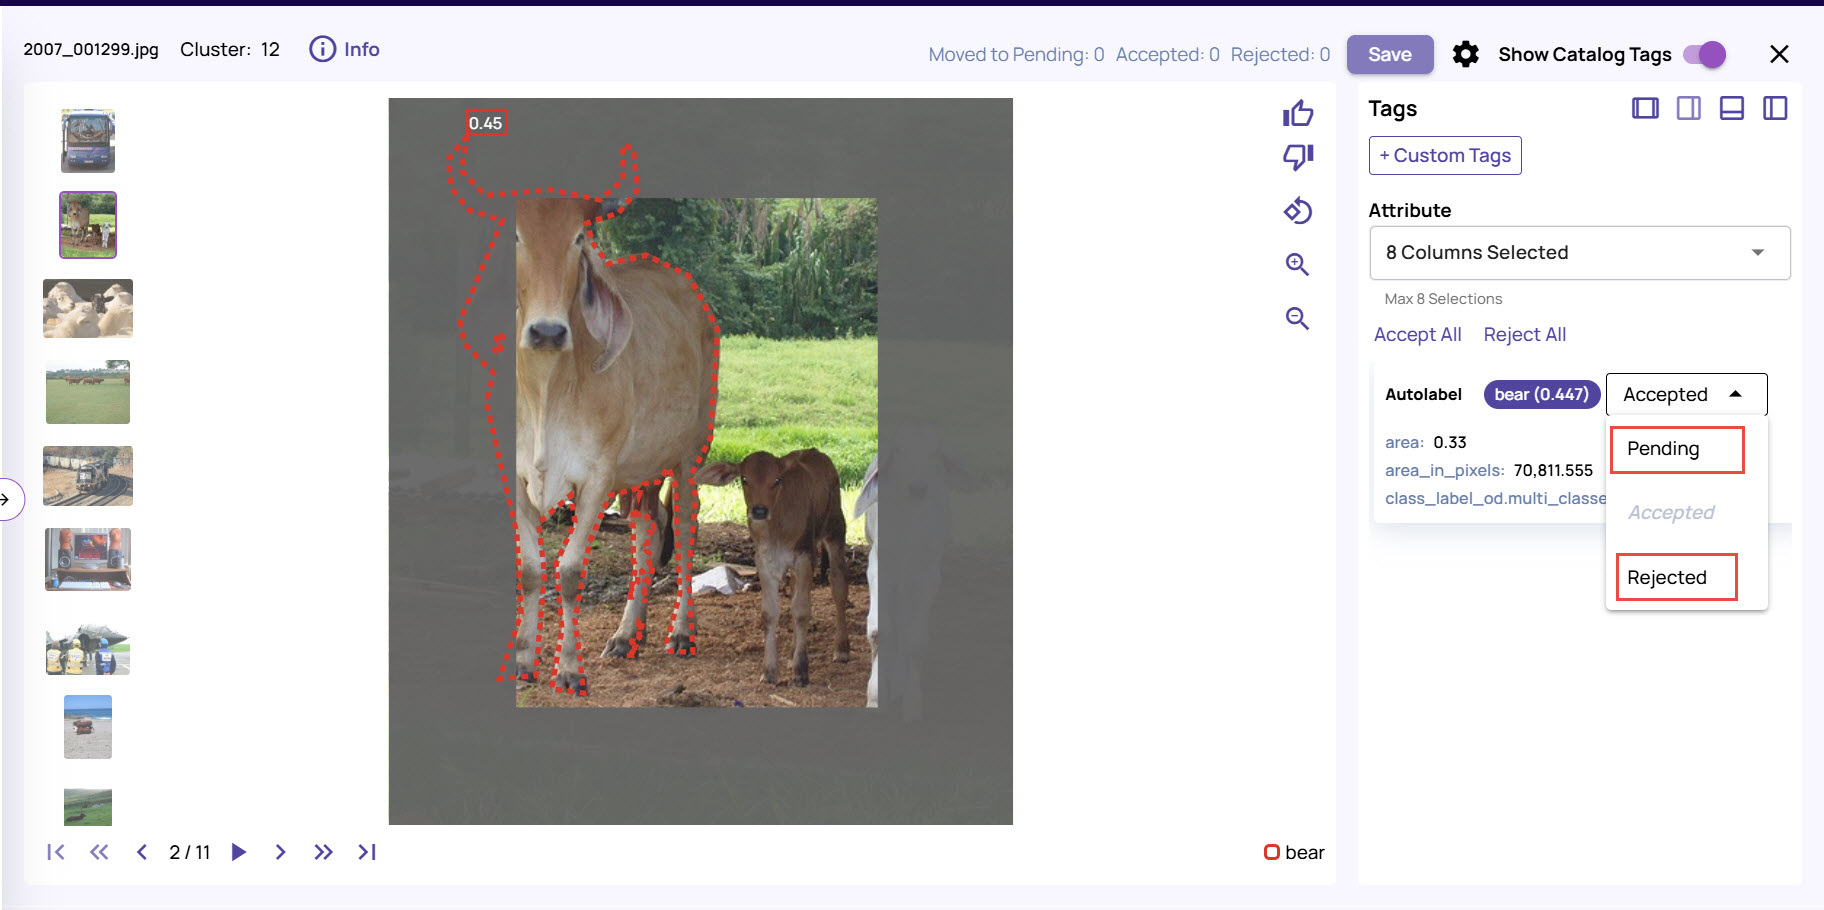
Move an accepted result to a Pending for review or rejected state.
On the label page, under the Accepted tab, click the required value, and click the image icon on the top right of that section.
Click the Reject or Move to pending button located at the bottom-right corner.
You can accept the results of the label job and move all the images under Accepted tab, any time. For future reference, you can also create a result set and export it to the corresponding catalog.